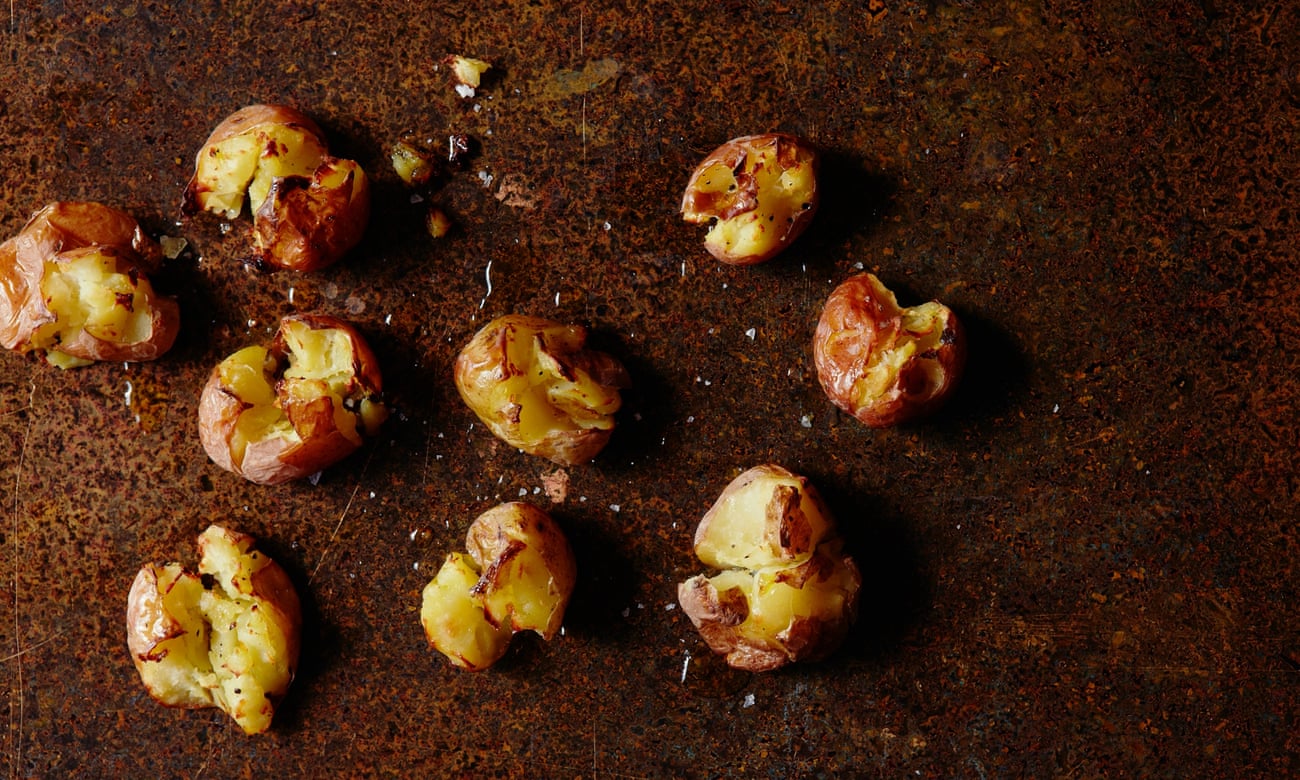
Roasted salt and vinegar crushed new potatoes
A delicious take on the lip-smacking crisp/chip flavour. Serve alongside some
succulent pork chops.
Serves 4
750g small red or brown new potatoes
2 tbsp extra virgin olive
oil
Black pepper
2 tbsp cider vinegar
1-2 tsp flaked sea salt, for
sprinkling
2 tbsp flat-leaf parsley, chopped
1 Preheat the oven to 220C/425F/gas mark 7. Boil the potatoes in salted water
until knife-tender. Drain. Put back in the pot to dry out a little. Tip on to a
very large baking tray.
2 Using a tea towel gently crush each potato but leave them whole. Drizzle
them with the olive oil and season with pepper. Bake for 20-25 minutes or until
the edges are browned and crisp.
3 Remove from the oven and gently toss with the vinegar. When all of the
vinegar has been absorbed, sprinkle with sea salt and parsley.
Jennifer
Joyce, jenniferjoyce.co.uk
Baked new potatoes in browned lemon butter
New potatoes are most often steamed or boiled, but they bake wonderfully,
too, and the browned lemon butter in this recipe transforms them into something
special. Serve with a handful of watercress.
Serves 4
650g new potatoes, washed
125g unsalted butter, diced
Juice
of ½ a lemon
Salt and black pepper
1 Preheat the oven to 190C/375F/gas mark 5. Add the potatoes to a pan, cover
with water, bring to a boil then simmer for 8 minutes. Check them by piercing
with a sharp knife: they need to be just firm, not soft or overcooked.
2 While the potatoes cook, add the butter to a saucepan and place over a
medium heat. It will melt, then foam, and then settle down. At this stage the
solids will start to brown and the butter will smell nutty. As soon as you see a
golden colour in the pan, tip the butter into a bowl to prevent over-cooking –
it is very easy to burn. Add the lemon juice, being careful of any hot
splashes.
3 When the potatoes are cooked, drain them, then add back to the pan. Shake
them around in the pan so that they break up a little, but don’t be too rough:
you just want to expose the flesh.
4 Add the bashed potatoes to a roasting tray, spoon over the browned lemon
butter, sprinkle with sea salt and black pepper then place them in the oven for
8-10 minutes so that they crisp a little and soak up the butter. Give a little
stir half way through. Serve warm.
Andrew Dargue, Vanilla Black
Braised
new potatoes
Brand-new spuds are bursting with flavour, which braising with a couple of
simple, fresh ingredients only serves to highlight. These are perfect with roast
chicken, and any leftovers can be served cold, dunked into mayo.
Serves 4
25g butter, plus a knob to finish
1 tbsp olive oil
12 baby
onions, peeled
2 garlic cloves, sliced
400g baby new potatoes,
halved
300ml vegetable stock
3 sprigs lemon thyme, leaves only
Zest and
juice 1 lemon
2 tbsp chives, chopped
2 tbsp chervil or flat-leaf parsley,
chopped
Sea salt and freshly ground black pepper
1 Heat the butter and oil in a large frying pan over a medium-low heat. Add
the onions and cook for about 8 minutes, or until they start to soften and take
on some colour. Add the garlic and cook for a further minute.
2 Add the potatoes, cut-side down, then pour over the stock and scatter with
the thyme leaves and lemon zest. Partially cover the pan and cook for 20
minutes, or until the potatoes are tender – you may have to add a splash more
stock if the potatoes are drying out.
3 Once the potatoes are tender, pour in the lemon juice and a knob of butter
and shake the pan well. Remove from the heat, sprinkle with herbs and plenty of
seasoning and serve.
Rosie Reynolds, rosiereynolds.co.uk
Chorizo and new
potato hash with poached eggs and salsa verde
Both the salsa verde and hash base can be made in advance so this makes for a
very quick and easy dish if you have guests. Reserve a few leaves of the herbs
to garnish the dish with at the end.
Serves 4
For the salsa verde
A large handful of basil, finely
chopped
A large handful of mint, finely chopped
A large handful of
parsley, finely chopped
2 tbsp capers, finely chopped
150ml rapeseed
oil
Juice of ½ a lemon
1 tbsp dijon mustard
Salt and black pepper
For the hash base
500g new potatoes, washed
250g chorizo, deskinned and
cut into 3mm slices
2 red peppers, roughly diced
2 green peppers, roughly
diced
2 red onions, roughly chopped
A generous splash of rapeseed oil
1
tsp dried oregano
1 tsp smoked paprika
1 tsp ground cumin
Salt and
black pepper
For the poached eggs
8 eggs
A dash of white wine vinegar
1 First, make the salsa verde. Mix all the ingredients together. Taste and
adjust the seasoning with salt and lemon if needed. Set aside.
2 To make the hash, put the new potatoes in a pan and cover with cold water.
Add a little salt toin the pan and bring to the boil. Once cooked (poke with a
sharp knife –when the potato slips off the knife they are done) refresh in cold
water and drain in a colander.
3 Preheat the oven to 180C/350F/gas mark 4. Quarter the cooked new potatoes
and place in a bowl with the chorizo, peppers and onion.
4 Put the rest of the ingredients in the bowl and rumble around until
everything is nicely coated in the oil, spice and seasoning.
5 Place on a baking tray and roast for 20-25 minutes until the chorizo has
released its oil and everything is nicely caramelised. (This can be made in
advance and reheated in a frying pan or in the oven when ready to serve.)
6 Now poach the eggs: bring a large pot of water to the boil and add the dash
of white wine vinegar. The larger the volume of water, the better formed the
poached eggs will be, as they will set their shape to a teardrop before hitting
the bottom of the pan.
7 Reduce the heat so that the pan is just at a simmer and crack your eggs in
and poach for 3 minutes. Once done remove carefully with a slotted spoon and
drain on kitchen paper.
8 To assemble, place a good heap of the hash base on a plate, top with 2
poached eggs and a good dollop of salsa verde. Finish the plate with a good
twist of black pepper and some picked herb leaves.
Alex Bluett,
friskafood.com
New potatoes, Mont d’Or and cornichon salsa
An alpine classic. Vacherin Mont d’Or is a cheese truly made for baking and
dipping, especially with a batch of the first of the season’s jersey royals and
a side of crunchy salsa.
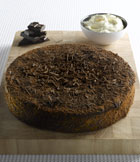
A baked Vacherin Mont d’Or, with new potato dippers,
and a side of crunchy salsa.
Facebook
Twitter
Pinterest
A baked
Vacherin Mont d’Or, with new potato dippers, and a side of crunchy salsa.
Photograph: Yuki Sugiura for the Guardian
Serves 4
400g new potatoes, washed
1 small Vacherin Mont d’Or cheese,
at room temperature
1 garlic clove, peeled and sliced
1 sprig of rosemary,
leaves picked
100ml dry white wine
For the salsa
50ml white balsamic vinegar
50ml extra virgin olive
oil
½ tsp mustard
½ small bunch flat parsley, finely chopped
1 banana
shallot, peeled and finely diced
75g cornichons, drained and finely
chopped
Salt and black pepper
1 Put the potatoes in a medium saucepan with plenty of salt, cover with
water, bring to the boil and simmer until just tender. Drain. Season again and
drizzle with olive oil. Reserve and keep warm.
2 Heat your oven to 180C/350F/gas mark 4. Remove the film from the cheese and
wrap some foil around the sides and base of the box. Make a few incisions into
the cheese and insert slices of garlic and rosemary leaves. Scoop out a small
part of the centre and pour in the wine. Bake the cheese for about 12 minutes
until soft and gooey.
3 Meanwhile make the salsa by whisking together the vinegar and olive oil
with the mustard. Mix in the parsley, shallots and cornichons and season.
4 Remove the cheese from the oven, and the foil from the cheese. Serve with
the potatoes for dipping and the salsa on the side.
Ben Tish,
saltyard.co.uk
Pommes fondants
As every lover of springtime produce knows, the best new potatoes need only
butter to sing.
Serves 4
500g new potatoes, as much the same size as possible, well
scraped, washed and dried
45g butter
1 Choose a heavy pan with a lid – a frying pan, saucepan or saute pan will do
provided it is of a size that will accommodate all the potatoes you are going to
cook. Each potato should have space to lie on the bottom of the pan with very
little room to spare, or the butter may burn. Melt the butter very gently in the
pan, than put the potatoes in whole.
2 Cover the pan and cook over a low flame, shaking the pan from time to time
to make sure they don’t stick. After 10 minutes have a look at them, and when
they are getting brown turn them over very carefully and cover the pan again.
Small potatoes will take 20-25 minutes, larger ones 10 minutes longer. They
should be golden on the outside and fluffy on the inside.
Adapted from
Elizabeth David: On Vegetables (Quadrille)
Spanish tortilla
New potatoes fried until soft and savoury and seasoned with paprika combine
in this classic tortilla. Serve as a generous lunch with a salad of peppery
green leaves and a handful of the sweetest cherry tomatoes.
Serves 4
350g new potatoes, washed
A splash of olive oil
A pinch of
sweet paprika
Salt and black pepper
2 onions, sliced
2 garlic cloves,
roughly chopped
4 eggs, lightly beaten
1 Cut any large potatoes in half so all the pieces are roughly the same size.
Bring to the boil in a saucepan of salted water, then reduce the heat and simmer
for 8-10 minutes, until just soft. Check by pushing a knife into a potato – if
it goes in without too much resistance, they are ready. Be careful not to let
them get too soft, otherwise they will fall apart during frying.
2 Drain and cool, then dry, cut into cubes and fry in a good glug of the oil
over a medium-high heat for 10 minutes. Keep turning to ensure a good all-round,
golden, crisp skin. When ready, sprinkle with paprika and salt and set
aside.
3 Slowly saute the onions for 15-20 minutes in light olive oil until they are
very soft. Add the garlic and fry for another 2 minutes. Add the onions to the
potatoes and allow the whole lot to cool. Now add the eggs and mix, crushing the
potatoes a little as you do so. Season with salt and pepper. Now taste a little
of the mixture and adjust the seasoning accordingly.
4 Heat a deep 15-20cm frying pan with a good splash of the oil. When it
begins to smoke, pour in the egg mixture: be careful as it may spit. Shake the
pan from side to side with the handle so it doesn’t stick.
5 Reduce the heat to its lowest and cook for 4-5 minutes. Put your finger in
the middle and feel how far through the egg is cooked. When it is cooked halfway
through, it is ready to turn. Have a large plate ready to tip the tortilla on
to. Using a tea towel and being careful of your hands and arms with the hot oil
– and working over the sink in case of any spills – flip on to the plate.
6 Return the pan to the heat. Scrape off any bits that may have stuck and add
a little more oil. When it’s hot, slide the tortilla back into the pan, raw-side
down. Shake from side to side again to make sure it isn’t stuck. Using a wooden
spoon, tuck the rough edges underneath to make them rounded, then cook for a
further 5 minutes. Slide on to a plate and allow to cool. Serve at room
temperature.
Tom Hunt, The Natural Cook (Quadrille)
New potato, wild
garlic and parsley soup
Paired with the fresh aroma of wild garlic, new potatoes make a wonderfully
savoury soup here.
new potatoes make a wonderfully savoury soup in this
fragrant dish.
New potatoes and wild garlic make a wonderfully savoury and
fragrant soup. Photograph: Yuki Sugiura for the Guardian
Serves 2-4
70g butter
1 onion, chopped
A splash of dry white
wine
250g new potatoes, sliced
1 litre vegetable stock
2 tsp
salt
40g wild garlic, washed
150g flat-leaf parsley, picked and
washed
A dash of cream
1 In a pot, melt the butter on a medium heat and add the chopped onions. Cook
these until they are translucent.
2 Add the wine and let the alcohol evaporate. Add the potatoes, stock and
salt and simmer for 30-45 minutes until the potatoes are completely soft.
3 Remove the pan from the heat and add the wild garlic, parsley and cream and
blend the mixture in a food processor until smooth.
4 Adjust the seasoning to taste and serve with croutons and a drizzle of
extra virgin olive oil.
Cesar Bartolini, head chef, Gordon Ramsay’s Plane
Food
Italian braised peas, broad beans and new potatoes
This fritteda is an Italian celebration of spring, bringing together all the
best vegetables this time of year has to offer. It also has the advantage of
being vegetarian and very versatile – eat it with a chop, piece of fish, on
toast or stirred through pasta.
Serves 6
4 tbsp olive oil
1 large onion, finely chopped
2 garlic
cloves, finely sliced
500g asparagus, tips put to one side, stalks finely
chopped
400g small Jersey Royal potatoes (or other new potatoes), scrubbed
and halved
½ bunch parsley, leaves picked and finely chopped
½ bunch mint,
leaves picked and finely chopped
A handful of marjoram leaves, finely chopped
(optional)
400g freshly podded broad beans (frozen are fine)
400g freshly
podded peas (frozen are fine)
A squeeze of lemon juice, to
taste
Extra-virgin olive oil, to finish
Salt and black pepper
1 Place a large, wide pan over a medium-low heat and warm up the oil before
adding the onion, garlic and asparagus stalks. Add a good pinch of salt and
sweat gently for 10 minutes until soft, but not coloured.
2 Add the potatoes, half the herbs and a splash of water. Stir well, turn the
heat down to low, cover with a lid and leave for 15 minutes.
3 Meanwhile, bring a small pan of salted water to the boil and blanch the
broad beans for 1 minute before draining. Remove the lid from the wide pan and
stir in the broad beans and peas. Season well with salt and pepper and add
enough water to come halfway up the vegetables. Cover with a cartouche (a piece
of parchment paper cut the size of the pan) and leave to bubble away for a
further 15 minutes, lifting the cartouche and stirring occasionally.
4 Taste and check that the broad beans, peas and potatoes are completely soft
and tender. Continue cooking if not. Remove the cartouche, stir in the asparagus
tips and give them a minute or two to cook through. Stir in the remaining herbs,
check the seasoning, then squeeze in a little lemon juice to taste. Finish with
a generous glug of extra-virgin olive oil.
Georgia Levy and Ben Benton,
thekitchencooperative.com
Royal potato salad
The ubiquitous potato-mayo-mess has nothing on this elegant, aromatic
plateful.
Serves 4
15 quail eggs
800g jersey royals, washed but not
scrubbed
20g basil leaves
20g parsley leaves, plus extra for
garnishing
60g parmesan, grated
60g pine nuts
2 garlic cloves,
crushed
200ml olive oil
150g petit pois (blanched for 30 seconds and
refreshed)
½ tsp white-wine vinegar
1 bunch sorrel (or mint) leaves,
finely shredded
Salt and black pepper
1 Put the eggs in a saucepan, cover with cold water and bring to a boil:
simmer for 30 seconds (semi-soft) to two minutes (hard-boiled), according to
taste. Refresh in cold water and peel.
2 Boil the potatoes for 15-20 minutes until soft but not so that they are
falling apart. Meanwhile, put the basil, parsley, parmesan, pine nuts and garlic
in a food processor and blitz to a paste. Add the oil and pulse until you have a
runny pesto.
3 As soon as they are cool enough to handle, cut the potatoes in two (they
will absorb more flavour when hot) and toss with the pesto, peas, vinegar and
sorrel. Mix well – even crush the potatoes slightly so all the flavours mix.
Taste and adjust the seasoning, being generous with the pepper. Cut the eggs in
half and fold into the salad. Garnish with parsley.